Been a while since I wrote anything on here, exactly two months it looks like. Still, following Esteban's suggestion, I'm not going to apologize for lack of content on here, since my commitment is to quality, not quantity. I've been busy the past couple of months, with my day job taking most of my mental and physical energy. When I do have energy and time to myself, I usually spend it on riding or working on more tangible projects, rather than directing energy to this creative medium. But today, I find myself with a bit of downtime, waiting for some things to come together, so I decided to try to get some thoughts down on here and a provide a bit of an update as to recent activity.
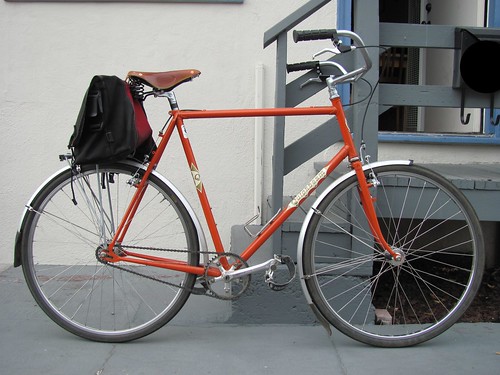
The burst of thinking and writing around February and early March definitely helped to break me out of some mental ruts I had been riding for a while, regarding bike setup and fit. Asking myself to let go the idea of transcendence, as I did at the end of my Late Feburary: Highlights post, got me thinking about how to introduce more variety into the range of bicycles that I own. I started thinking that rather than trying to approach a similar, transcendent fit on both the Casseroll and the Quickbeam, what if started to thinking about making them as different as possible, at opposite ends of a continuum of bike fit? Looking at them, the Casseroll seemed to be best suited to being the road bike, with drop bars and a stretched out riding position. Looking at the Quickbeam, I started thinking about making it more upright, befitting its main purpose of town riding in traffic, where being aero isn't ever a concern and visibility is a huge benefit. This was spurred on by looking at pictures of old British "Roadsters" as a model for upright, all-purpose bicycles, and then by building up a Heron Wayfarer touring bike for my wife using Nitto Promenade bars, and seeing how well it came out. She loves it!
Deciding to go bolt-upright on the Quickbeam, and still concerned about bar leverage and rotation after having had issues with the Civia bars I tried last fall, got me thinking about the slam-dunk solution: the Nitto Bosco Bullmoose handlebars from Rivendell.
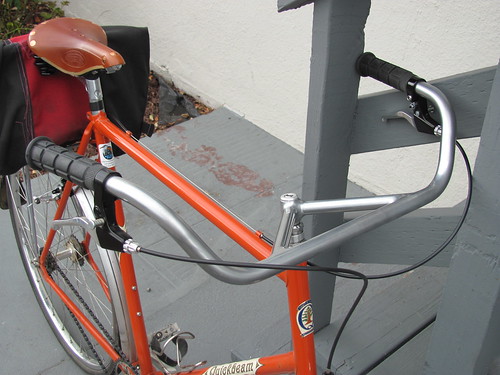
Definitely enough rise and, more importantly, sweep back to get me in a bolt-upright position. From all reports, they offered quite a variety of hand positions as well, allowing you to incline your back if the situtation demanded. Finally, being chromoly and brazed as a single piece to the stem extensions, they provided no chance of me overcoming the stem clamp and rotating the bars under heavy riding. As long as they allowed out-of-the saddle climbing, important for when I took the singlespeed QB up into the hills, and the angle was a decent fit for me, they looked like neat handlebars.
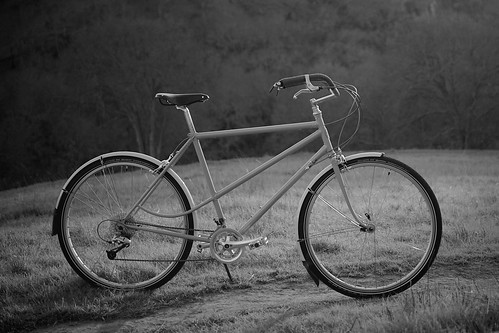
The Bullmoose version being available exclusively from Rivendell, I headed out to their Walnut Creek headquarters to check out the bars for myself before buying them. It was a fun time, mostly talking to Keven and Vince, who had helped me when I first bought the Quickbeam, and fellow customer and RBW Owner's Bunch member Jim W., who it turns out was probably the guy for whom my QB frame was originally intended, before he decided to go with a Hillborne instead. But the real revelation of the day came test riding. The only bike in the showroom which was generally my size and featured the Bosco Bullmoose handlebars was the ~59cm Proto-Appaloosa, a prototype of a new bicycle designed specifically around handlebars such as this and an upright primary seating position. It features a very long top tube (65cm on the 59cm bike!) and very long chainstays to keep the bike balanced well with the upright riding position, as well as an extra main frame tube and rear stays to maintain triangulation on the stretched frame, a feature which is becoming a distinctive Grant Petersen trademark. I had long been curious about the bike, ever since I had been the first to guess its design intention based on seeing a picture of the unbuilt frame.
 |
| Photo Credit: Olivier Chételat |

I have since been putting in a fair number of miles on the Quickbeam and am really happy with the conversion to fully upright riding. It had the desired effect of increasing visibility and motivation for around-town riding, now that any trace of stretch required for riding had been removed. Furthermore, it has performed well on long, hilly rides, including off-road; I feel absolutely no loss of power with the upright position over the previous racy flat-bar setup. I can slide my hands forward on the long extensions when I need to incline my back some. On long paved descents I can even get aero and still access the brake levers in a kind of Graeme Obree/Alpine Ski Racer position. Particularly surprising is how well it feels to climb out the saddle. There is definitely enough room between the grips for me to stand up and swing the bike, and it feels totally natural and powerful to do so with my arms basically in line with my torso. The best analogy I can think of is that it feels like pushing a large load in a wheelbarrow, in a totally good way. Longer rides on the upright Quickbeam have felt really good, with little or no back pain, feeling more refreshed longer into the ride. Furthermore, the upright position does great things for improving the view--I've noticed new things on rides that I had done dozens of times before.
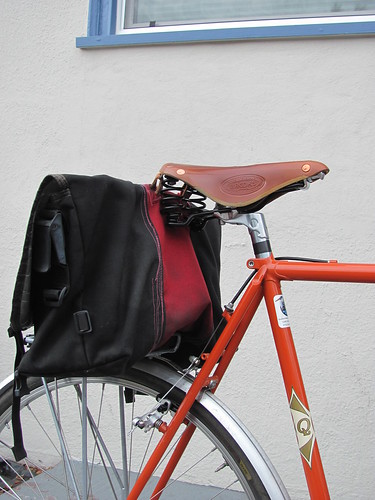
The other component change that the conversion to fully upright riding on the Quickbeam has incurred is in my saddle. I was kind of getting there before, but once I had the Bosco bars on the Quickbeam, it quickly became clear that I was going to need a saddle with a wider, flatter platform than the narrow Terry Fly Ti that I had been using. I decided that it was finally time for me to try to the gold standard, and get myself a Brooks saddle. Probably a sprung one, as befit the Quickbeam's new "Roadster" setup. So, I ordered a Brooks Champion Flyer Special saddle in Honey colored leather. The Champion Flyer is a sprung version of the ubiquitous B.17, and it has been perfect for this bike. Initially, I was concerned about achieving enough saddle setback with Brooks' notoriously short saddle rails, so I also sought out and acquired an SR MTE-100 super-setback seatpost at the same time. However, wanting to keep that seatpost for another project (more on this below), I just bolted it to the 40mm offset Nitto S-84 seatpost that was already on the Quickbeam, and lo and behold, the setup has been perfect--very well balanced. This supports my suspicion that saddle shape has at least as much to do with balance and effective saddle setback, than does seat tube angle, seatpost offset, and seat rail length.
So where has this gotten me? I have successfully introduced some more variety into my bike setups, and have struck on a setup that really works for the Quickbeam, that I think I'll keep for a while (but you never know on that one). In fact, the setup was so successful that I now have a new, derivative bicycle in the works based on what this experiment has shown me. This project is the confluence of two threads: first, a desire to rebuild my Trek 520 touring bike, a bike I've had for 11 years (it was my first "real" bike, an took me on a coast-to-coast touring trip when I was 17) and is very close to my heart, but has recently fallen into disrepair. Secondly, feeling the upright conversion working so well on the Quickbeam, I wanted to build another bike with a similar (but not exactly the same) upright riding position, using the popular Nitto Albatross handlebars, but with a full complement of wide-range gearing. As much as I love fixed gear riding for commuting and city riding, the truth is sometimes it's hard to motivate myself for longer rides on the singlespeed, even though the Quickbeam handles such rides with aplomb. Furthermore, I wanted a bike with even wider gears than the Casseroll road bike, for handling extended and steep off-road climbing or climbing with (touring?) loads. So, Plan A was to build up the Trek as just such a machine, and I've been acquiring parts to do just that.
But as the label "Plan A" implies, last week that project hit its first snafu. In the process of stripping down the Trek for the rebuild, I discovered that the headset was basically toast, and decided to replace it. I went to remove the headset cups with the traditional Park headset remover, only to find the lower one seemed hard to remove. After having much difficulty, I discovered the problem: the Trek frame had brazed-in interior reinforcing rings at each end of the headtube. Instead of seating the cup remover on the top edge of the headset cup, I had seated it on the reinforcing ring and was hammering on that. Placing the remover properly, the headset cup came out with a single tap. Concerned that my hamfisted mistake had caused damage, I took a small flashlight and thoroughly inspected my headtube. This is what I discovered:

Fairly certain that these were cracks in the headtube, radiating from the downtube vent hole as far as the area of the downtube weld penetration, I quickly posted pictures to Flickr and the iBob forum to get a second opinion. Consensus seems to be that they are in fact cracks (there may be as many as 3 or 4 of them, it's hard to tell), but they probably weren't caused by my hammering but rather probably had formed as a result of the (rather large) vent hole not having been properly deburred, and/or the joint cooling too fast after welding. Meaning, these cracks had probably been forming for a long time.
This discovery left me without a workable frame for the "Geared & Upright" project, throwing things into limbo for a while. Some suggested that the frame might still be covered under Trek's lifetime frame warranty, but I expect that a) it would be an effort to get Trek to come through on this one and b) even if they did, they'd probably offer me one of the current 520 frames, whose geometry is different from my 2002 frame in ways that don't work for me (namely, a steeper seat tube angle). Headtube replacement is a totally feasible frame repair, but it would probably take a while to find an amenable builder to the repair, work it into their queue, get the frame back, refinish it, and get it up and running again.
I was really looking forward to riding this bike this summer, especially on a couple of rapidly approaching rides in June. Taking stock of what I had, I decided that the best course of action would to find a new, quickly-available frame that matched the function and component spec of the Trek, and use the parts that I had earmarked for the Trek to build up a new bike to ride this summer. And really, thinking about an affordable steel, 700c touring frame with cantilever brakes and clearance for 40mm+ tires, with good geometry for an upright riding position, one option stood out: the Surly Long Haul Trucker. Definitely not the rarest or prettiest of frames out there, in recent years the LHT has become an extremely popular choice for people looking for a touring bike or a capable all-rounder, and for good reason. I built up one of the LHT complete bikes for a friend recently, and I was impressed by the quality and features of the frame, not to mention the smart parts spec on the complete bike. And, Surly being part of the QBP empire, I could get one in my size and get it built up, quick.
So, taking a couple of days to mull it over, I placed an order for a 64cm LHT frame, the same frame size as my Quickbeam and the largest made by Surly. Looking at discussions of LHT sizing, many note that they have relatively long top tubes for their sizes (compared to Rivendells, for instance), so it can be good to go down a size from a Riv-style fit, especially if you plan to use drop bars. Since I'll be using Albatross bars, I decided to stick with the 64cm.
I'll be financing the frame purchase with some of the money that I've been saving towards taking a framebuilding class. As for the Trek, I still think I'll get the frame repaired, but more as a learning experience than as something than I need to get riding soon. I'd like to find a framebuilder who's amenable to letting me help out, or at least to watch them work, so I can experience the process a bit more directly.
Last Friday, after work, I took the Casseroll out for a ride. Having been focusing on the Quickbeam and this new project, I haven't been thinking about much about the Casseroll. Heading up Tunnel Rd in the evening light, I found the low, stretched out position of my raciest bike not really working for me. It wasn't that it was uncomfortable per se: considering the fit issues that I had been working through with that bike, I think I've made a lot of progress. But I found myself longing for the upright, relaxed position on the Quickbeam, but also wishing for even lower gears than I had on the Casseroll.
Confident that this next project would help me build on everything I've learned, both with the Casseroll and the Quickbeam, I turned the bike for home, ready for the experiments to come.